Somewhere out there in cyberspace there is a blog called Epbot. On that blog called Epbot, there is a robot, perhaps it is also called Epbot -- I've never asked his name. For now we will call him that. Epbot.
Some time ago I made Epbot out of clay. Or at least attempted it. He may be a little off in a few places.

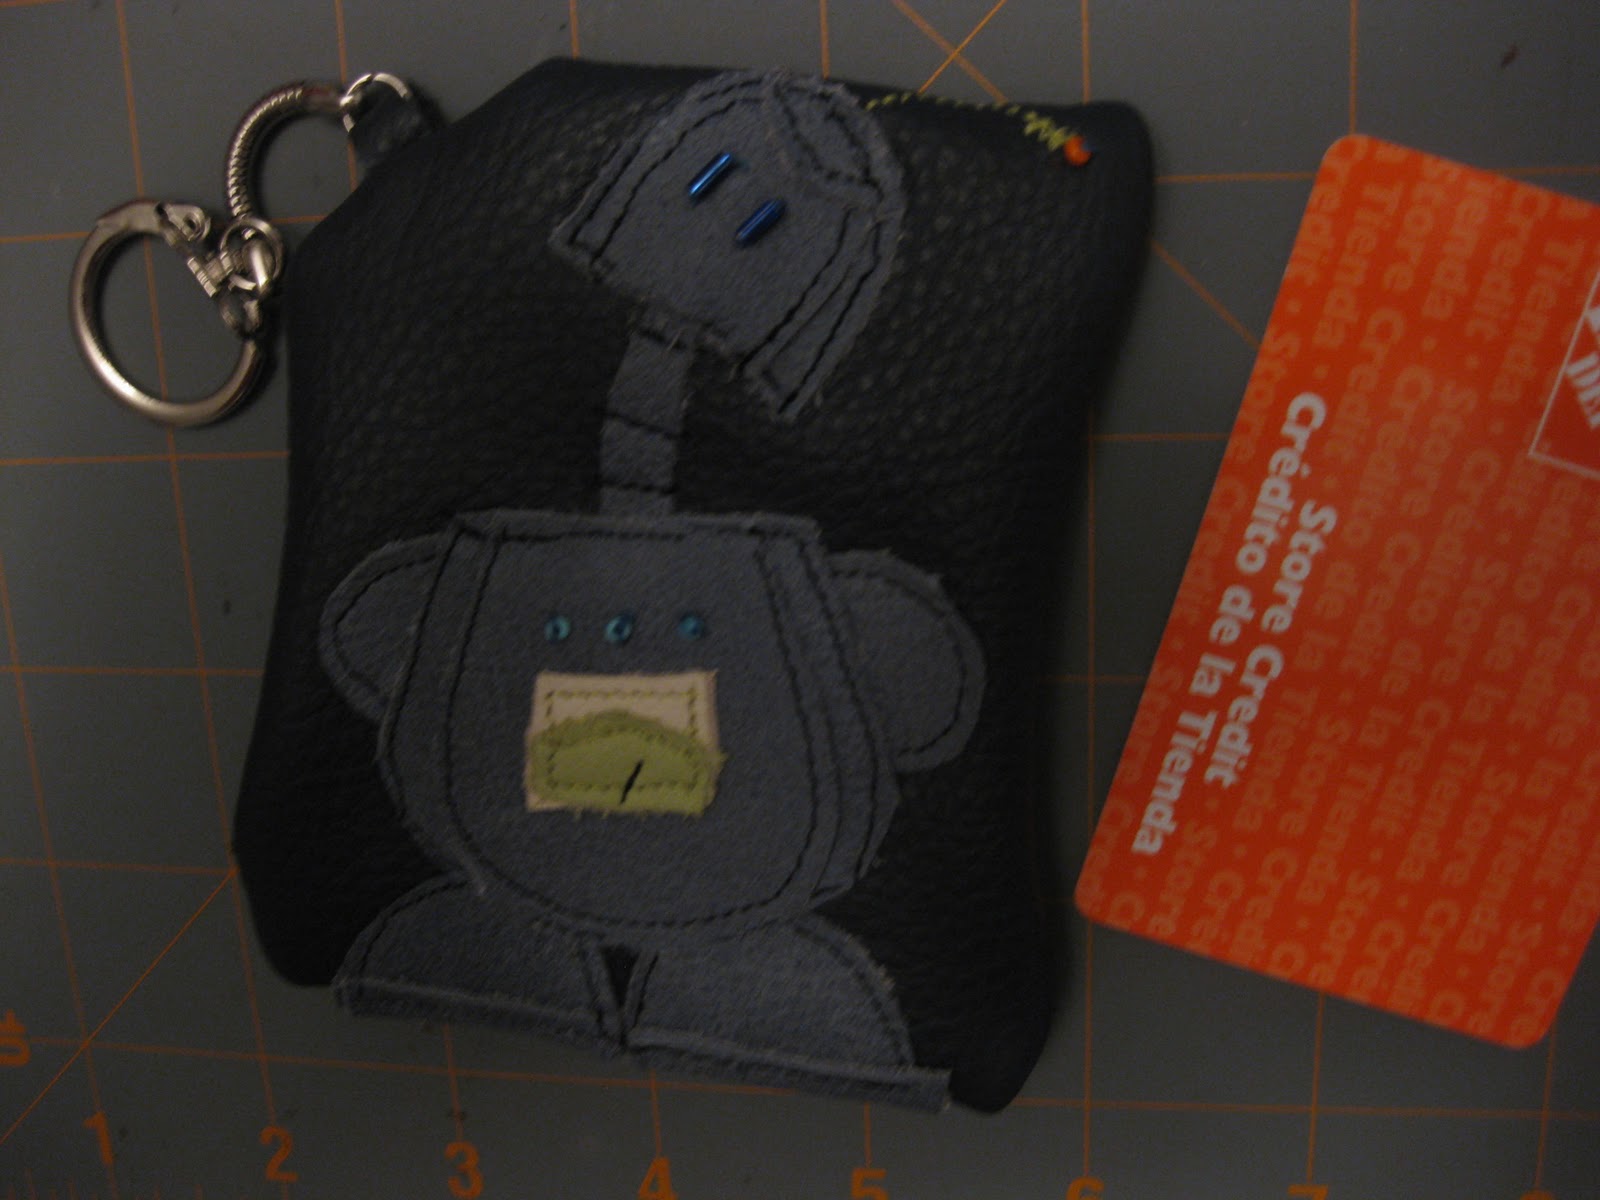
Then a few weeks ago, I started making little coin purses and, in a search for ideas, (and perhaps a bout of non-creepy stalker-dom) made Epbot again -- along with all sorts of others, but for now we're focusing on Epbot.
Then I realized I'd forgotten his ear-things and his flower.
How could I???
It was something that even in my non-perfectionist perfectionism, needed to be fixed but pulling apart one of these little purses isn't easy. When I sew something together, it usually stays sewed. Especially leather, where the holes are permanent. Easier, I thought, to try again and do it right this time.
Something that is regularly done on Epbot, the blog, is crafty instructions so it seemed fitting, while trying again, to take lots of pictures and make a tutorial. Here is Epbot Purse the second, who will pose for photos in various states of incompleteness.

First, I photocopied the original, so I could use him as my pattern. I think the first one turned out very well except for the forgotten bits, but I'm never very prepared for making things multiple times. Usually when I decide on an idea I get the scissors and the fabric (or leather in this case) and start cutting. Then when it's done, if it's cute, I think perhaps I should have made a pattern while the pieces were all separate. By then, of course, it's too late. So, scanner and tracing paper to make a pattern modeled on attempt number 1.
Then I cut it out and tried again. After assuring myself it would work, I traced it on white paper and scanned it in. Then I put it on Google Docs to share with all of you. Epbot Pattern! I've never been the neatest of people, so it's a little messy. Forgive me. --Oh, also, this is a tracing of the pattern pieces I used. That means, if you are a perfectionist, you should cut inside of the lines rather than the outside. Otherwise it grows a little with each copy.
I still had some leather left in the first colors I'd chosen, so I used that again and cut everything out.


I suppose now is the time to tell you that Husband got me a really good sewing machine for Christmas/birthday five years ago (a Husqvarna) and I'm not sure how many layers of leather a normal sewing machine can go through. If you want to make it but not leather, there is a liquid called, I think, Fray Check or Fray Stop so you could probably use that with fabric without worrying about raggedy edges.
But back to the instructions. Fold the purse again to find the right placement for the key ring if, like me, you forgot to mark it the first time. Sew it pointing in (as pictured below) so it ends up on the right side when the whole thing gets sewn together.

Zipper time. Sew both sides. If you use a properly sized zipper for the project instead of scrap zippers collected over years of garage sales, like me, it will get a little difficult to sew the second side -- I open it and sew flat on both sides, but once the purse becomes a loop, it gets harder to not sew the rest of the purse into the zipper unintentionally. I haven't come up with a clever way to fix this yet other than using really long zippers so I get tons of extra room when it's unzipped. I usually just sew slower to be sure everything is where it needs to be. This is the hardest part.

In the beginning I did this part with the pull-tab in the center, half-closed, half-open, but it's really easier to do the closed side first, then open the zipper all the way and do the other. --Also, I sew over the stress points, like the zipper and the keyring tab, several times to make them extra sturdy. If you sew over metal zipper teeth on a too-long zipper, go really slow so you don't break your needle. Usually it slides beneath the presser foot just enough to sew through without assistance, but you might need to wiggle it to one side or the other. It is also more important to sew through several times if you will be cutting the zipper shorter.


Trim the extra off the edges, especially at the corners. Make them as tight to the seam as you can. If you use leather (or probably pleather) or fleece it won't unravel so you don't have to worry when you cut close to the seam. Just don't cut the seam itself. Also, because I choose the zipper out of my scrap bag based on color rather than size, I have to trim the excess off there too.
Taa daaa!


Oh, that's the back.
One more try! Taa daa!

Now both bots are in a box to be shipped off to Jen (from Epbot) where she will either provide or find a good home for them.
And in case it gets lost in the center of that paragraph up there...
Epbot Pattern!
Any questions?
If you would like a how-to/pattern for any of my other monster purses, vote below. Voting ends with the year 2010 (US-EST) and I'll have it up by the end of January.
UPDATE: Since EpBot linked to this one middle February, I'll reopen the tutorial/pattern offer today (2.21.2011) for a week, and next Tuesday (2.28.2011) I'll post a tutorial for the monster with the most interest.
I... I love you for this! owo In a non-creepy way, of course. Now, if you'll excuse me, I'm off to the craft store.
ReplyDeleteThank you. There are a number of steps but he's not hard to make at all. Good luck.
ReplyDelete